Cookie Baking Tips

This weekend, my son was home from college. It was too icy to go outside. I decided to bake cookies, something that I enjoy doing and that makes everyone happy. Because I have the right tools and professional experience, baking up several batches is not a chore (and cleanup is easy, everything goes in the dishwasher!) I’m a relaxed cook, but I’m fussy about the details because it’s the details that take a cookie from okay to spectacular.

My son’s favorite cookie is a spice cookie. Years ago, I found the recipe in the newspaper. I’ve changed it up a little (I use a stick of butter and 1/4 cup of oil, and half white whole wheat flour.) The first thing to know about this sort of recipe is that if the spices aren’t fresh, it won’t be right. If a sniff of your spice jars leaves you with a stale, musty impression, throw them out and start fresh! I take the extra effort to grind nutmeg using a nifty little tool (I don’t use nutmeg a lot, and so a jar of it goes pale in flavor quickly, but freshly-ground is vibrant.) I have a stand mixer, which makes easy work out of the stirring. I pay close attention to the batter. As soon as it looks smooth, I stop. This prevents over-beating and toughness in the finished product.

But, it’s the baking itself which determines whether your cookies are perfect or not. Always preheat the oven. Always try to give yourself time and attention to devote to the baking. A minute can be the difference between the right texture and under or over-baked. Since cookies are so finicky with timing, the more uniform the cookies are, the more evenly they’ll bake. I use scoops to get them all the same size.

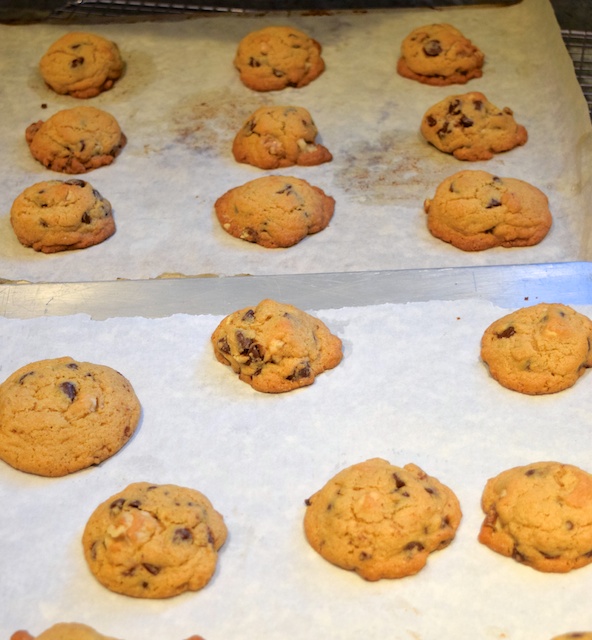
The most essential step is follow is the one that says, “place the cookie sheet in the center rack of the oven.” It seems so time-consuming and wasteful to bake only one sheet at a time! We’ve all filled the oven up. This is what happens:

spice cookies

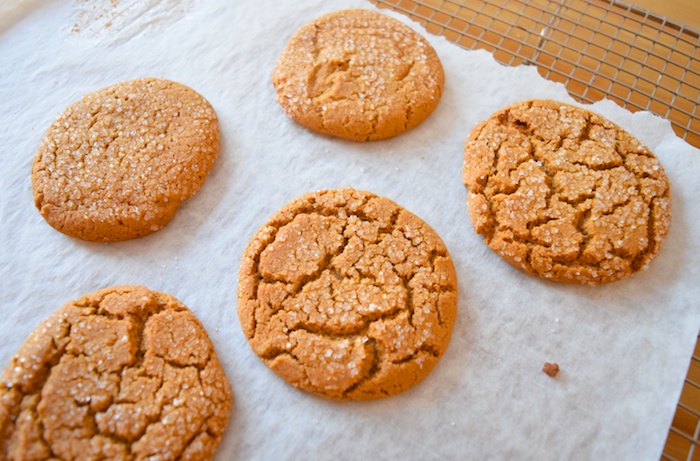
The cookies on the middle rack cook perfectly. The surface crackles. They spread evenly. The two cookies to the back of this photo were baked on a sheet below the others. The top baking sheet blocked the flow of heat. They took longer to bake. They didn’t crackle. They taste fine, but they miss that quality that the others have.

(Although convection ovens are supposed to solve this problem and allow you to bake with sheets on each rack, I find that the blowing air dries out the cookies. I don’t use convection for dessert baking.)

Notice that I bake on parchment paper. I buy a large flat box that lasts me years! Not only does baking on parchment ease cleanup, but the cookies brown perfectly and rarely scorch.

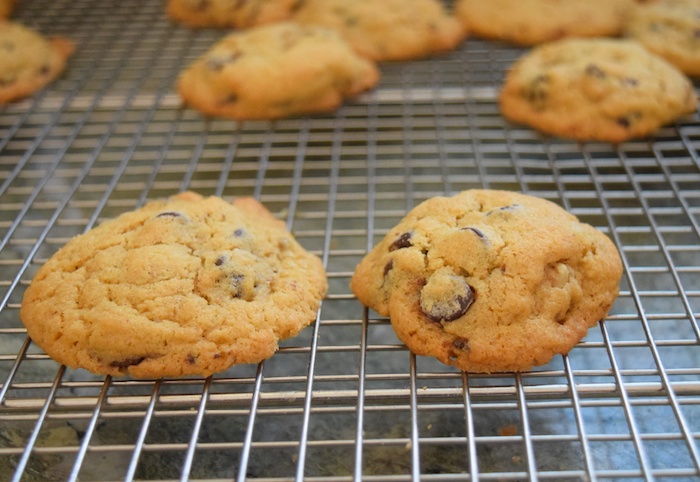
The baking sheets themselves make a difference. Air-cushioned baking sheets allow the cookies to bake through before the bottoms burn. For large and soft cookies, I prefer them. The sheet to the front is the cushioned pan, the one in the back is a typical aluminum sheet of metal. These were both baked at exactly the same temperature, oven position and length of time.

baking cookies

Note the that cookies in the back didn’t spread as far, and they browned up quickly. That’s good for some cookies. If you’re baking lacy cookies, a thin baking sheet is best. It’s up to what you like. In this case, they’re both delicious.

chocolate chip cookies

Do you have cookie baking questions? Ask away! I’ll answer here in the comments.

It’s Almost Here!

FEGC cover


The Farmstead Egg Guide and Cookbook will be available on March 11!

It’s already received a starred review in Library Journal. (Hopefully, your local library will get a copy. Please ask your favorite librarian.)

I’ll be celebrating here at HenCam with a blog tour. Make sure that you stop in on March 12 when I post the schedule. Each day, for a week, a blogger will be discussing The Farmstead Egg Guide and Cookbook and giving away a copy.

I also have a number of speaking engagements and book signings lined up. Check my events page (which is updated frequently) to see if I’ll be appearing near you.

Don’t forget that I have a Chicken Keeping Workshop scheduled here at Little Pond Farm on April 5. If you’ve been thinking about coming sign up now – I’ll be getting much coverage in the press (The Boston Globe!) and spots are going to go quickly after March 11th!

Clip-Clop

The riding ring at the stable where I board Tonka is buried under a foot of snow. There’s a 1/3 mile dirt track around the farm, and most of that has been too dangerously icy to ride on. There is though, one stretch that has thawed and frozen, and thawed again, and so once a week or so, I tack up Tonka and walk up and down that section.

But, the other day the conditions were just right. There had been two days of good weather and the ice melted. Then it got cold and the mud froze. I got on. We walked around the entire track, and then we trotted.

DSC_0268

I felt ridiculously happy. Something more than just sitting in the saddle had triggered that feeling of elation. As Tonka and I trotted along the path, I realized what it was. It was something that I was hearing:

Clip-clop, clip-clop.

Tonka’s hooves, striking the solid ground rung out.

Clip-clop, clip-clop.

You might think that you always hear that sound when riding a horse. It’s how riding is described in storybooks. But, in reality, the ground is muddy, or grassy, or too rocky. It takes just the right conditions to hear a true clip-clop. A what you imagine it sounds like to be on a horse clip-clop is a rare sound, indeed.

I’ve ridden for most of my life, but for most of my life I was also going deaf. Many years ago I heard that clip-clop on the few rare occasions I had to trot on a paved road (never done for any length of time as it is hard on the horse’s legs.) It’s been ages since hearing that, and in the last two decades, I couldn’t hear my horse’s footfalls no matter where they fell.

As I went deaf, many sounds receded into vague memories or were entirely lost to me. I am now hearing again (thanks to cochlear implants – read that story here) and so, when I heard that clip-clop ring out so true, so cadenced, so like a childhood dream of being on a horse, it was entirely unexpected.

DSC_0271


Having sound return to my world with CIs is not like putting on a pair of glasses and all of a sudden seeing. The brain has to relearn how to hear. Clarity comes with practice. Some sounds aren’t there, and then they are. Some sounds are rare, and the brain has to work to recognize them. But some sounds, like the clip-clop of a horse, go right through the ear and the brain, and right into the heart.

Shedding Season

The ground remains covered by a deep crust of snow and ice. Flurries are floating in the air. But the goats know that warm weather is on the way. They are shedding.

Goats have an undercoat of wooly, sticky fur, and an overcoat of long, rough hairs.

DSC_0045


The boys are itchy. They rub their bellies against the fence line. Birds come and gather the fur that’s stuck to the wire to line their nests.

DSC_0245


The goats need help shedding their heavy coats. They ask the Goat Maid to give them scritches. I use a tool called a shedding blade.

Ah, says Pip.

DSC_0250


The birds are going to have very soft nests this year.

DSC_0261

Winter Dust Bath

Chickens need to take a bath at least once a day. Not a soap and water bath, but a dust bath. All chickens get external parasites, and the most common is lice. This is not the same pest that is feared by all parents of grade school children! Poultry lice are avian specific. They are soft-bodied insects that feed not on blood, but on the detritus of feathers and skin on a chicken’s body. (Photos on my FAQ.) All hens have a few of these moving about on them near the vent. Chickens keep the population of lice in check by taking daily dust baths in dry dirt, which acts to desiccate and kill them.

In the summer dust bathing is easy to do. Hens scratch up a dirt wallow and laze in it in the sunshine. It is a communal activity that they enjoy immensely (video here.) But, what to do when the ground, what can be seen of it, is frozen hard?

winter chickens


To keep your flock healthy and comfortable in the winter, you need to provide them with a dust bath. I use a kitty litter tub that I half-fill with inexpensive coarse builder’s sand (available at most hardware and lumber supply stores.) I stir in about a cup of food-grade diatomaceous earth. (Be very careful that this is not the agricultural DE advertised for dealing with slugs in the garden – that DE is microscopically so sharp that it can kill your chickens.) The sand, by itself, makes for a good dust bath, but the addition of food-grade DE makes it a tad more effective at drying out and killing the lice.

I place the dust bath in a sunny corner of the coop. This is yet another reason to have a spacious coop with windows that let the light in. Chickens won’t dust bathe in a dark, cramped coop. I clean it out weekly using a kitty litter scoop. In their enthusiastic bathing, the hens kick the sand out and so I replenish it every few weeks.

I know that there’s something appealing to the hens about fresh sand (like clean sheets on a bed for us?) because when I fill up the box, the hens jump in.

Opal, the Delaware, is always the first. She’s also quite large, but the other girls find a way to squeeze in. There’s quite the queue.

dust bath


There’s much chortling and wing flapping. It reminds me of a bunch of tots enjoying a kiddie pool in the summer. There’s never enough room, but that’s part of the fun.

crowded dust bath