I’m a firm believer that having the right tools can transform a chore into an agreeable activity. This is true in my kitchen. I’m not one to use a lot of gadgets, but having well-made tools makes the process of cooking a pleasure. Put a sharp knife in my hand, and a seasoned wood cutting board under it, and I feel competent and happy. Hand me a dull knife and ask me to cut on one of those glass boards, and all I want is to get out of the kitchen.
The right tools can make or break your time in the chicken coop, too. Like in the kitchen, you don’t have to have a lot of tools, but they do have to be appropriate for the job and be in good shape. I learned this very early on. When I was sixteen, I spent 10 weeks at a riding school in England. There were three brooms for a dozen girls, and only one of the brooms had full, sturdy bristles. Woe to the girls who had to sweep with the worn out brooms! We’d hurry to the stable yard, hoping to be the first one there to grab the good broom. To this day, I get great satisfaction sweeping with a new broom.
Keeping the coop clean and dry is the first line of defense against disease and parasites. My routine is made easy with these tools:
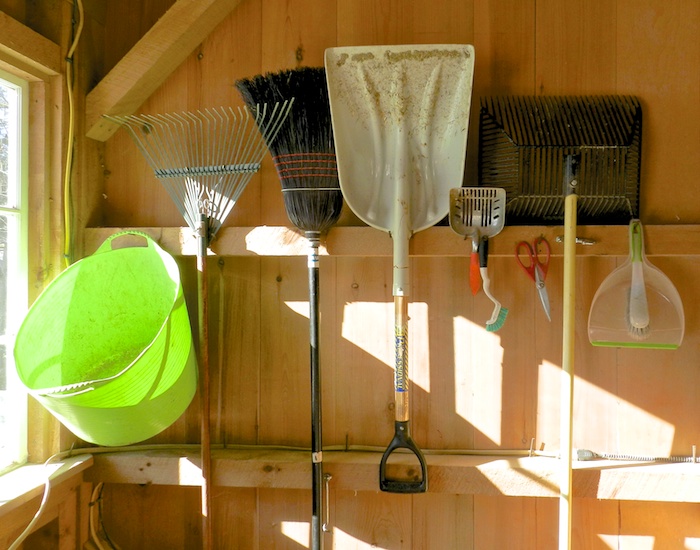
(from left to right)
You can’t cleanup without the right-sized muck tub (big enough so that the pitchfork fits, but not so large that it’s too bulky or heavy to carry.)
The metal rake is for tidying up the outside pen. It helps to loosen the dirt and remove manure.
The broom is both for sweeping up the floor, and also for getting down cobwebs. Cobwebs are reservoirs of bacteria and viruses. Sweep them out!
A plastic barn shovel is lightweight and wide and the perfect size for innumerable tasks. Once you have one in your barn, you’ll never know how you functioned without it.
A kitty litter scoop is good for quick pickups, and I also use it to clean manure out of nesting boxes. Spend a little extra money on a metal one. The plastic scoops break when kept outdoors.
A scrub brush is necessary for keeping waterers clean.
A good pair of scissors for opening bags and cutting baling twine (and once in a rare while for cutting a sticky fly strip off of a hen’s back!)
The fine-tined plastic pitch fork sifts out manure and leaves clean shavings. This will be a money saver for you as you’ll throw out less bedding.
A dustbin and brush is handy for cleaning in corners and wiping off nesting boxes.
Finally, make sure that your tools have an organized storage place. Hang them up where they are easy to reach and yet out of the way (if you have goats, you know how important it is to have passages clear and tools stowed where the goats can’t reach them to “help.”)
Have I left out your favorite chicken coop tool?
In another post I’ll list the things needed to setup a coop, like waterers and grain bins.
* Please note that I have Amazon links to these tools so that you can get an idea of pricing. I have not necessarily purchased items through these online stores. However, if you do shop Amazon, please start by clicking through a link on my site. I’ll get a small commission from Amazon, which helps to support HenCam. Thanks!

Nice and neat. I wish my coop was larger so that I could use the small-tined rake. But the kitty litter scoop is perfect!
As Lesley said, you can use a child’s size rake. I love seeing those rake marks in the run. My own little zen garden.
Great list. I also use a pitchfork to get bedding out when it needs changing, and I keep a metal scraper for getting hard poop off roosts! Yours looks much tidier than mine though – you’ve inspired me to get out there tomorrow and start tidying it all up! :)
Dog toe nail clippers, for those of us who keep senior citizen chickens and they don’t scratch and keep their own nails trimmed.
Yep, dog toe nail clippers are in my bin with the dog stuff, and I bring them to the barn as necessary. The nail clippers are more of something to keep in a first aid kit. This is my list of what I like to have on hand.
Terry or Ken with your dogs, do you use a small electric dremel to polish off the sharp edges of your dog’s nails after you have trimmed them ? I know I have to with Luna because her nails are still sharp after I trim them, and she will accidently scratch me when she gets on or off my lap. I find them to do a better job than the electric dog nail groomer, and was told several dog groomers also use such tools.
Very well said, as always with what you share Terry! A note about nail clippers, Quik Stop, is a great styptic powder is case a nail is trimmed a bit too short. A cordless nail grinder can be used also with a light gentle touch, also a simple emery board works. Being a pet stylist, ……
I’ve got the Quick Stop in my first aid kit.
in case*
The tool I wouldn`t be without is a children`s sized metal tonged rake. It is perfect for small spaces. I also love the sifter my son made me out of hardware cloth(it is aprox. 2ft by 2ft). I have sand in my outside run area and this makes clean-up every day so easy and quick.
The first time I saw a muck tub was here on hencam. I saw you and Steve cleaning out the big barn. I had to have one and have been glad every since. We were using an old plastic planter that wasn’t working out too well. Our coop is by our garden so this item is handy in so many ways. Doc made me a tool to help scoop the part of the run that doesn’t have sand. He took an old broom handle and duck taped a flexible, plastic dust pan to one end. I rake droppings, feathers and any other unwanted thing in a pile and just rake it onto the dustpan and drop the waste in the muck tub. It is a very handy tool along with the other tools you have listed here. These tools are a must and thanks for sharing them. It has made our work more enjoyable.
I bet you picked out a pretty one. I like my flexible tubs and they come in such fun hues.
Sniffle. I don’t have chickens. :( But I’m so with you on loving those wooden cutting boards!
Happy to share my hens with you :)
The answer to this is probably obvious but I’m going to ask.
Why is it you prefer the wooden cutting board over the glass?
Do you cut meat on the wood? If so how do you “sanitize” it?
I am by no means a germaphob (heck I walk barefoot in the chicken coop) but I have always been concerned about germs living in the wood.
Wooden boards are superior on many counts. First of all, hard plastic and glass dulls blades. Softer plastic soon gets ruined. When chopping, wood has just the right amount of give. I cut fast with a bit of a rocking motion, which I think only works perfectly on wood. As far as cleanliness – I’ve seen studies that show that a wooden board cleans up just as germ free as a plastic board when hand washed. Yes, you can sanitize plastic in the dishwasher. So, whenever I cut meat, I use a flexible plastic cutting “board” on top of my wooden one. That I put in the dishwasher.
I worried about the germs too. There’s enough advertisement out there to scare one away from wooden cutting boards. I switched for awhile but couldn’t stand that sound of the knife hitting something other than wood. It also makes a clean cut when doing it on wood. I gave up and went back to the wooden cutting board and just give it a good scrub and put it in the dishwasher. If that doesn’t sanitize it, then I don’t know what will. Maybe a little bleach in the dishwater? (Just a little) My cutting board is made of ash wood and stands up well to the dishwasher. I’m very interested in what others do to sanitize their boards, esp. a chef.
I’d hand wash your nice ash board. I do make a point of frequently swapping out my sponges. They go into the dishwasher to be sanitized almost nightly. It’s the cleaning with dirty sponges that is often the culprit for spreading germs!
I never thought about putting my dish sponge in the dishwasher. Thanks for a great tip. I do splurge some on my dish sponges. I like nice strong ones.
A tip on the sponge in the dishwasher. I put mine in the dishwasher as well but I use a plastic clothespin to clip it to one of the tines.
I had one fall from it’s wedged spot on the top fall on the heating element and when the washer went into dry cycle it started to smolder. I was home, don’t know if anything more serious would have happened had I started it and left.
Thanks Ken. That probably would have happened to me.
I just stopped in for a quick peek before bed. It’s nearly midnight. But somewhere out there someone -finally- actually did germ studies wood vs plastic. Turns out the plastic lost. More germs grew on the plastic than the wood. If I remember correctly, they believe there is something in the wood (tannins, maybe???) that kills the germs.
Well, late or not, this bugged me and I went surfing. Evidently the argument goes on. There are those who say the experiments were flawed. Others claimed to have done their own tests since then that support the original tests (both sides). Some claim plastic is better only until it gets knife scarred and then even the dishwasher won’t clean it. Others say that salmonella germs start dying within 3 min. on wood. Wood seems to have edged out plastic overall, but not with an overwhelming majority.
One thing I learned that kinda squicked me out is the fact that the cuts in plastic usually shed plastic bits that you could be ingesting. Gick. I also have plastic boards; my husband likes them. (I’d rather ingest wood bits than plastic bits!)
One of the smack-yourself-in-the-head items for me was the fact that you can throw your wooden cutting board in the microwave to sanitize it. That’s one of the ways you can sanitize your reptile or hermit crab wood. (Hellooooo!) I usually bake my lizard and crab wood in the oven ’cause it’s too big for the microwave. But, still, it should have been a no-brainer for me. *shakes head*
That’s as much as I’ve got for tonight! :)
Thank you for saving me from surfing. When I cooked at a health spa in the 1980s this debate was raging, and what you found now was true then. As I said in my comment, the most sensible thing is to use the wooden cutting board for everything, but when prepping meat, use the thin plastic over the top. I should have added, when that gets scarred, throw it out.
oh my gosh Terry! Thank you so much for the link to the metal kitty litter scoop!!! I have been asking the farm stores in town if they have one and no one stocks them…. Will order via your links for sure.
thanks!!!!!
Yay! It’s so much better than plastic. I don’t know why they aren’t more widely available.
Because I have 2″ x 4″ flat side up roosts, my favorite tool is a hand sander and 50 grit sandpaper. I use it to clean the roosts quickly and sand away splinters. I use it to clean up the ladders to the nestbox and chicken door. And before we designed the plastic sliding sheets to cover the nestboxes, I used it to clean the top of those.
I also have a good shop vac and use it once I’ve stripped the coop of the deep bedding. It works great to get the cobwebs and dust from the ceiling and inner wire wall, too. But mostly I have many of the same tools.
I’ve used a shop vac, too. Got zapped from so much static in the air!
I couldn’t do without my shop vac. I feel like it sucks up all the dust and cobwebs and bugs that the broom may leave behind.
I like that plastic barn shovel. I’ve been using a snow shovel for clearing out bedding, which works well because it’s lightweight and has sides, but your shovel looks like it would be easier to direct.
I’ve used a snow shovel, too, and the barn shovel is better. It’s even better for wet snow that I shovel out of the run.
I have just found your blog and am enjoying it immensely. The steaming trees made me think of cold western Ranch mornings when the cattle would stand in the sun and …steam….it is so beautiful to watch your video of the trees.
This blog about the equiptment is great. Tools to look after livestock are very important and i think people overlook them sometimes.
One item…in your coop, I had chickens out west in bitter cold and in winter I would get carpet scraps and tack them around the perches..{Upholstery tacks underneath the cross bars} It helped the hens feet and in spring the used carpet pieces were easy to remove and get rid of.
I’m glad you found me! How? A google search? The carpet idea is a good trick. I can just imagine the hens’ toes cozy in orange shag carpet :)
I love good tools, perhaps because my happiest winter evenings were spent in our basement next to the furnace playing with the tools on my father’s workbench. I never made anything, but I learned a lot about how things work and what to do when something’s broken.
great arrangement of your tools!!
I’m jealous. Being the girl, I wasn’t allowed to use the tools or fix anything. I didn’t know that all screws turn one way until I was an adult.
righty tighty, lefty loosey