Perfect Popovers

popover perfection


Perfect Popovers from the HenCam

3 eggs
1 1/4 cup all-purpose flour
1 cup milk (1% to whole is fine)
1/2 teaspoon salt
1 tablespoon melted butter

1. Coat a popover pan with non-stick spray. You can use a muffin tin, but the popovers won’t have the classic cylinder shape or rise as high.
2. Put the eggs, flour, milk and salt into a blender. Puree. Scrape the sides down a couple of times to make sure that dry flour doesn’t remain in the corners.
3. Blend in the butter.
4. Popover batter is best if it has a couple of hours to rest in the refrigerator, but you can use it right away. Preheat the oven to 400 degrees. Pour the batter into the popover pan.
5. Bake for 35 to 40 minutes until risen and golden brown.

makes 6 popovers

Crustless (Gluten-free) Quiche

5                                  eggs
2/3 cup                       whole milk
1/4 to 1/2 teaspoon kosher salt (quantity depends on the saltiness of the cheese)
1/4 teaspoon             freshly ground black pepper
1 tablespoon             minced fresh herbs of choice
1/3 cup                       crumbled or diced cheese
1/2                               sweet bell pepper, sliced

1. Preheat the oven to 325° F. Coat a pie plate with non-stick spray, or grease with butter.

2. It’s always best to assemble your ingredients before cooking. Crack the eggs into a bowl. Measure the milk, etc. Despite the overnight hard frost, oregano and parsley were still green and crisp in my garden. I snipped some, and washed and minced the leaves.

oregano

3.  Using an electric mixer (or a wire whisk and your own energy) beat the eggs and milk for one minute until uniformly yellow and a tad frothy.

4. Stir in the herbs, salt and pepper. Pour into the pie plate.

5. Drop in the cheese, evenly distributing it throughout the quiche. I used feta cheese, but any number of cheeses would be excellent. I’ve made this with marinated mozzarella balls, and also with grated sharp cheddar.

6.  Arrange the strips of bell pepper on the top. These will sink a bit, but you’ll still see them.

unbaked quiche

(Notice my helper in the kitchen who is cleaning the bowl.)

7. Bake for 30 to 35 minutes until the quiche puffs up.

crustless quiche

The quiche is most impressive right out of the oven, it will deflate as it cools. No matter! It’s delicious room temperature, too, which is how I served it, along with goat cheese brie and crackers, a cabbage slaw made with dried cranberries and nuts, and a green salad that used the last of the romaine lettuce from the garden. For dessert we had a cortland apple crisp.

The Best Scrambled Eggs

Yet again, a food magazine has come up with an improved scrambled egg recipe. I’m sure it’s very good, as is any recipe with extra egg yolks and cream. However, they’re really and truly missing the point of what makes scrambled eggs the perfect food: ease and simplicity.

To make perfect scrambled eggs, put a pat of butter into the cast iron skillet, (other pans will do, but the heavier the better.)

DSCN8628


Crack two eggs into a bowl (the fresher the eggs the better):

DSCN8619


and with a fork, stirred them up with a splash of milk and a pinch of kosher salt. Put the eggs to cook over medium heat. As the egg set, move them gently about with a spatula.

DSCN8638


In about three minutes, you’ll have perfect scrambled eggs.

DSCN8643


Scrambled eggs are perfect this way, but also excellent embellished with cheese and/or sautéed vegetables. Sausage is good, too. Such scrambled eggs make the best dinner when you don’t feel like cooking at all. But again, they’re the best because they’re not fussy. (Recipes can be found in my Farmstead Egg Guide and Cookbook.)

Chocolate Chip Cookie Pie

Have you ever seen those huge cookies at the mall? That greetings are written on? Take that idea, but make it fatter and softer, and yummier (because of the better ingredients you’ll use at home) and put it into a piecrust. There are plenty of recipes for this dessert (sometime called Toll House Pie) floating around on the web. Over the years I’ve looked at, and tried, many of them. I have growing boys, and despite the varied and creative array of pies that I bake, this is their favorite. I’ve tweaked the amount of sugar and chocolate chips, and left out the nuts (which they don’t like) and have come up with this version. The recipe can be doubled, and it freezes well. If you don’t have teenage boys about, you might have enough to put aside for another day.

Chocolate Chip Cookie Pie

1                        piecrust for a 9-inch pie (see master recipe here)
1 1/2 sticks      unsalted butter (6 ounces), at room temperature
1/2 cup             white sugar
1/2 cup             brown sugar
2                        eggs
1/2 teaspoon  vanilla extract
1/2 cup             all-purpose flour
1 cup                chocolate chips

1. Put the piecrust into a 9-inch shallow pie plate (this is the regularly-sized plate, not a deep dish.) Set it into the freezer while preparing the pie filling (freezing helps to keep the pie crust from becoming soggy when baked.) Preheat the oven to 325 degrees F.

2. Beat the butter and sugars until fluffy. I use a stand mixer, but this can be done with a hand-held mixer, or even energetically by hand. Beat in the eggs and vanilla until smooth.

3. Beat in the flour until well-combined.

4. Stir in the chips. Do this by hand, or, if you have a stand mixer, on the lowest setting.

5. Spread the filling into the piecrust and place the pie on the center rack of the oven. After 45 minutes, check the pie. When done, it will feel springy in the center and the crust will be lightly browned. It might take up to one hour to bake, depending on the pie plate and your oven.

This is very good with vanilla ice cream.

DSCN6016

The Best Apple Pie

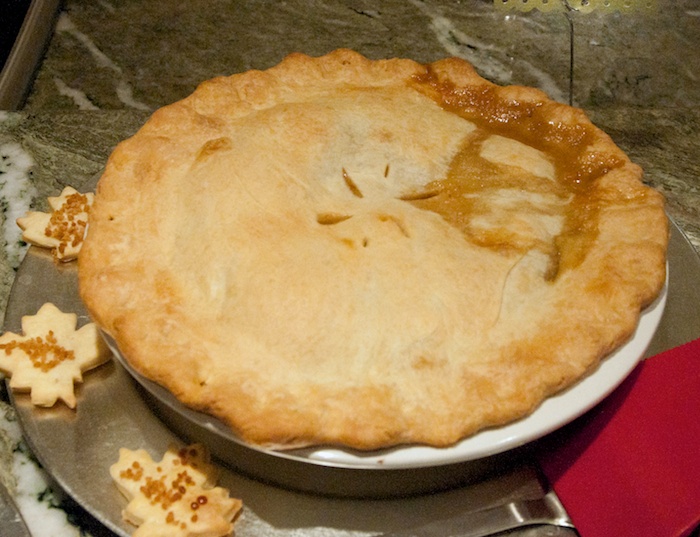
Forget what you might know about apple pie, those gloppy fillings that taste more of sugar than fruit. Forget the pies that taste like candied apples. The best apple pies have a balance of sweet to tart, they have a sharp fruit flavor that has you thinking of orchards and rain. The crust flakes and crumbles in your mouth and the apples somehow have bite and yet are soft. That’s a perfect apple pie. Here is how you make it:

First of all, you need the right apples. Pass by the Delicious, the Braeburn and the Fuji. If the only baking apple options at your market are Romes and Cortlands, get those. Macintoshes add sweetness, but they turn to mush when baked, so use only a few. Better yet are the older varieties of apples, the Golden Russet, Northern Spy and Winesap. If you can, add a few Macouns to the mix. These apples have true apple flavor, not the one-note sweetness of the supermarket offerings.

Don’t worry if, after washing the apples, they all get jumbled up and you can’t tell them apart. Start with the right varieties and you can’t go wrong, no matter the proportions.

DSCN5112


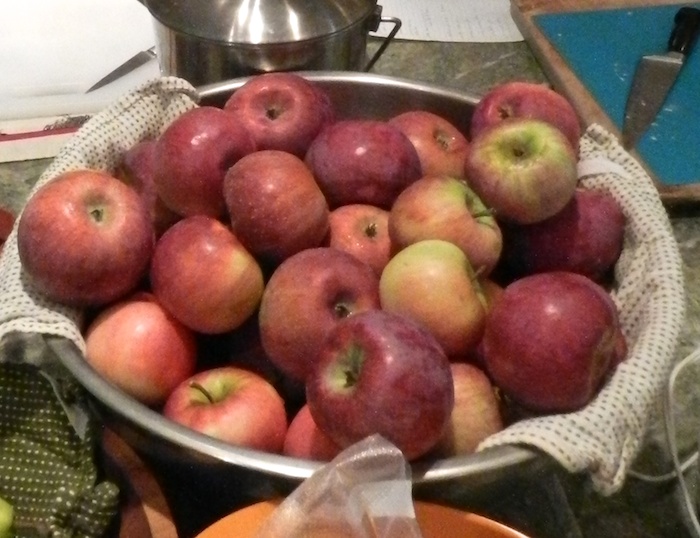
You will need 8 cups of peeled, cored and sliced apples. The slices should be thin and uniform so that the filling cooks evenly and all the way through. The best way to do this is to use a nifty

which peels, cores and slices with the turning of a crank. You can read all about it in this post.

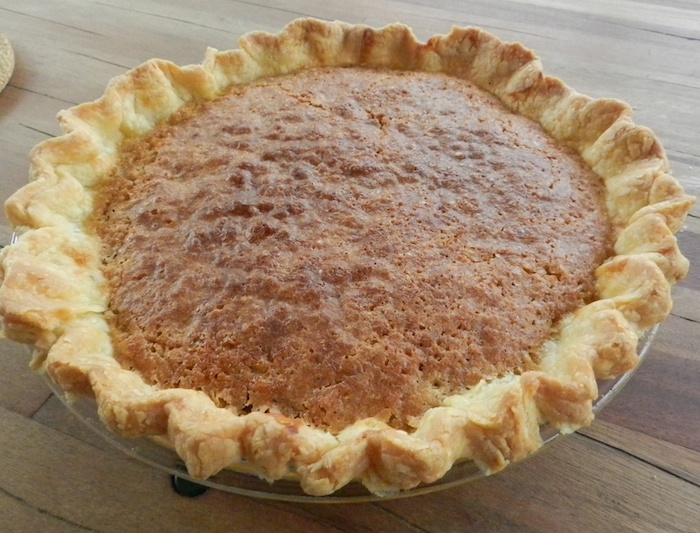
You will need a 9-inch deep pie plate, and two pie crusts, one for the bottom and one for the top. Use this recipe.

You will need sugar. You can use regular white granulated sugar, but the flavor is just one note. I prefer demerara or organic sugar which tastes more complex, but without the heavier molasses flavor of brown sugar.

You will need a thickener. Some use flour, but I think that gets gummy and tastes raw. You can use modified food starch, which yields a silky and clear filling. Or, you can use instant tapioca, which is readily available at markets. Don’t use too much, or the filling will be more like candy gone wrong more than a classic pie.

The Best Apple Pie

2 pie crusts, for top and bottom
1/2 cup sugar, preferably demerara or organic
1/2 teaspoon ground cinnamon
1 tablespoon fine, instant tapioca or 1 tablespoon clear gel (modified food starch)
8 cups peeled, cored and sliced apples
optional: 1 tablespoon maple sugar and/or 1 tablespoon minced crystalized ginger

1. Preheat the oven to 350 degrees F. Place the bottom crust in the pie plate and put in the freezer while prepping the rest of the ingredients. Filling a frozen crust keeps it from being soggy when baked.

2. In a small bowl, combine the sugar, cinnamon and tapioca. Mix evenly.

3. Stir the sugar mixture into the apples to coat.

4. Put the apples into the crust, mounding in the center. Drape the top crust over the apples.

5. Trim and flute the edges of the crust. Slice vents in the top.

6. You can put a cinnamon stick in the center if you wish. If you like a brown and glossy crust, brush with egg wash. For a soft crust, brush lightly with cream. You can dust with a bit of sugar. But, you don’t have to do any of these things and pie will still be lovely.

7. Bake for 45 minutes, or up to over an hour. Insert a sharp paring knife into a vent to test for doneness. It should slip right in without resistance. The length of baking time will depend on the freshness and moisture content of the apples.

Enjoy!!

_DSC5749