Chicken Coop Bedding

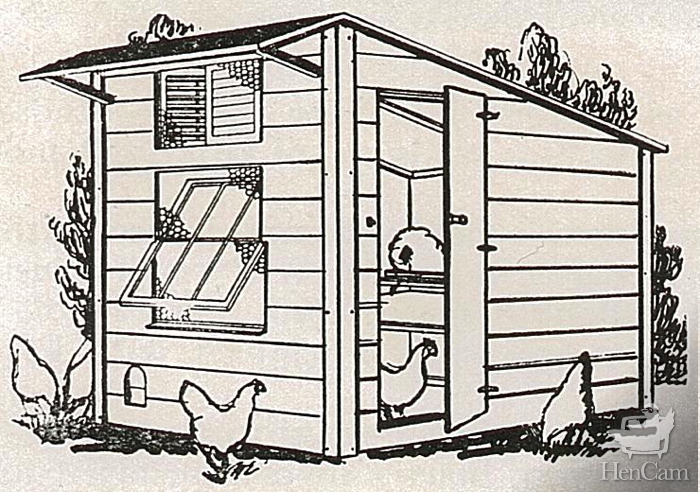
The floor of your chicken coop might be dirt, wood or concrete. On top of that goes bedding.To pick out the right bedding you have to understand what it does, so first I’ll explain its purpose, and then list some of the options.

Birds don’t pee – everything comes out in one plop, and that pile is more than 75% liquid. As the manure breaks down it gives off caustic and smelly ammonia fumes, and water evaporating from the manure makes the air damp. Healthy poo is an almost solid pile that is streaked with white. But once a day, a hen leaves a runny brown mess which is expelled from her cecal pouch. This is perfectly normal, although rather nasty. It’s not something easily cleaned off of a bare floor. Chickens produce manure all day and all night long. In fact, they poop so much while sleeping that there will be piles of it under the roosts in the morning. A hen is not like a rabbit, which is a tidy animal that likes to have its bathroom area in one place away from her den. Chickens poop everywhere, and they cannot be trained to do otherwise. Each hen will defecate about four ounces a day.  So, if you’re going to have chickens, you need to plan for how to keep the coop clean and how to handle that manure. The first step in manure management is to have bedding inside of the coop.

I want a coop that I can walk into without saying ewww! The right bedding on the coop’s floor will function to dry up the manure, and keep it as whole as possible, until you, the “farmer” skips it out (use a

) into a Red Gorilla Large Flexible Plastic Tub, Toy Storage, Laundry, Gardening & More, 38 Liter/10 Gallon, Blue and remove it to the compost pile.

The right bedding can also keep the hens occupied. They need to scratch, and hard floors cannot satisfy this ingrained behavior. Bare earth doesn’t work either. It stays damp, and the hens will make big craters. Some people tout the use of a deep litter system for their coops, which certainly gives the chickens a thick layer of bedding  to scratch in. However, for many reasons, this is not a good choice for most backyard flocks. I write about that here.

Chicken Coop Bedding Options:

Pine Shavings: Wood shavings are excellent bedding; bags of pine shavings are widely available at feed stores and are not too expensive. Shavings are absorbent, and it’s easy to use a fine-tined pitchfork to sift through them and clean up manure. Some people have access to the leavings from a friend’s woodworking shop. It’s great to get free material, but make sure that there are no metal bits (chickens will down anything sparkly), that it’s not dusty, and that it’s sized so that the bedding is absorbent (big chunks of wood won’t do!)  Sawdust is not good bedding because your active chickens will kick up a fine dust and that will cause respiratory issues. Also, be aware that not all types of wood makes for good bedding. Cedar and oak can be caustic, and black walnut is very dangerous for some animals.

DSCN2000

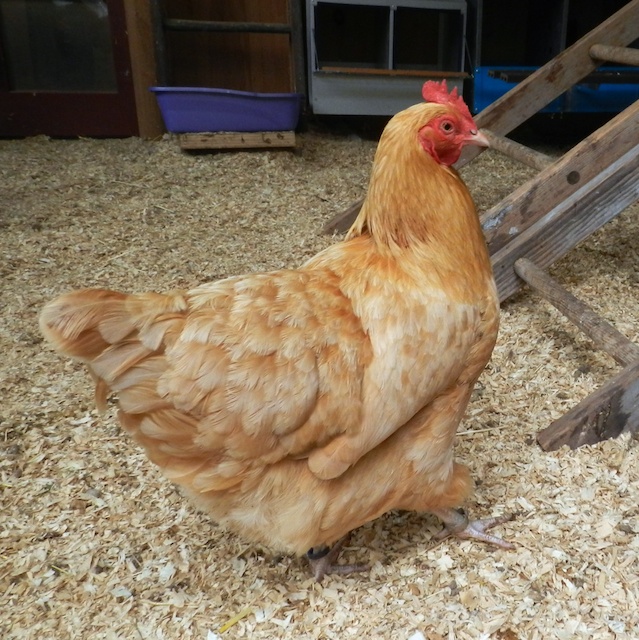
Pine shavings used as chicken coop bedding.


Hay and Straw: These two are not the same. Hay is made of green, tall, grass that has been dried and baled. The tough yellow stalks left over from harvesting grains like wheat makes up straw. Straw, like hay, is sold in large rectangular bales. Both have drawbacks as coop bedding. One serious issue is that chickens can get impacted crops from trying to eat them.  Also, both are poor absorbers of moisture and will mold rather than dry out. Additionally, is difficult to clean manure out of a coop layered with hay or straw without removing all of the bedding, too. Years ago, farmers had chaffing machines, which chopped hay and straw into small bits. Although not as absorbent as wood shavings, chaff is acceptable bedding. There is a new product for backyard flocks that combines chaff with a naturally absorbent mineral. It’s more expensive than pine shavings, but the chickens love scratching in it, and the coop stays very dry. I’ve written about it here.

DSCN7471

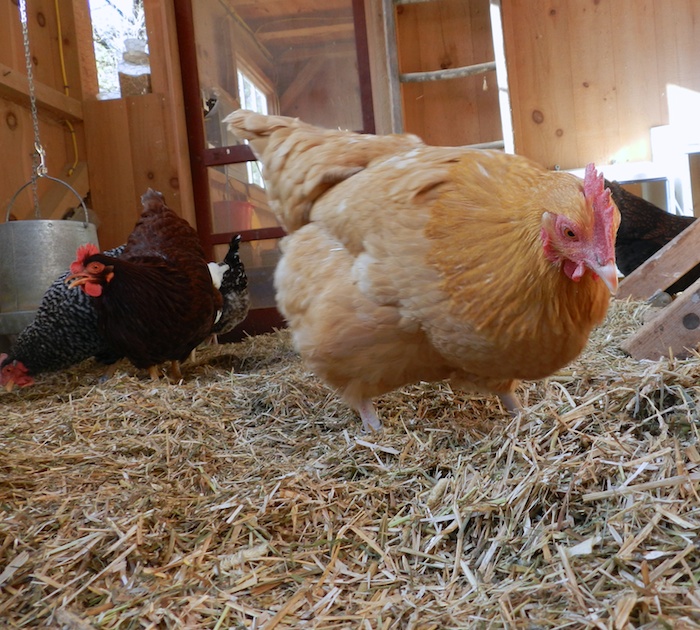
Koop Clean used as chicken coop bedding. 

Other Plant-based Bedding: There are all sorts of things available on a regional basis – peanut hulls, pine needles, and dried leaves to name a few. Although they are not absorbent, if you have enough, and they are free, and if you remove and replace the bedding weekly, then they are possible options. You’ll know if they’re working okay if the air in your coop smells fresh and feels dry.

Sand: I do not like this option. Although it is easy to clean, sand holds moisture. I’ve heard from enough people who have had respiratory diseases and frostbite due to sand flooring to caution against its use. Also if your coop has a sand or dirt floor, rats and predators can easily burrow their way into your coop. I always like to see a solid floor in a coop. Personally, I prefer concrete, but wood floors are also a deterrent to vermin.

To tell if you’ve chosen the right bedding, and that you’re keeping it dry and refreshed, stand in the coop (or put your head in if you have a small henhouse.) Breathe the air. If you aren’t comfortable – if your eyes water, if you cough from dust, if it feels damp, then your hens aren’t comfortable either. If, though, it’s so nice in there that you want to pull up a stool and spend time with your chickens, then the bedding is just right.


Coop Dimensions And Design Criteria

If you’re thinking about putting chickens your backyard, there’s a bewildering selection of prefab coops, building plans and advice out there. Unfortunately, many of the coops are poorly designed and are far too small for the number of birds that they advertise that they can house. There’s also been a plethora of “reinvented” coop ideas. I’m all for fun design, but not at the expense of the health of my hens.

Here’s what your laying hens really need:

Interior floor space: A minimum of 4 square feet per chicken of interior floor space. This doesn’t count the nesting boxes (some coops have them on the floor) or the exterior covered run space.

Interior air space: Chickens need to roost at least 30 inches up off of the ground, and have head space to do that comfortably.

Roosts: 6 inches per hen. I prefer rounded roosts. Hens have special ligaments in their legs that lock in place when they sleep. This is how they can sleep without falling off the perch. To do this, they need to be on a round roost. Roosts should be at least 18-inches off of the floor to allow the hens to breathe clean and dry air while sleeping. If possible, have roosts at varying heights because that helps with flock dynamics. A ladder-style roost is best, so that the heavy hens can hop up and down. There should be head room above the top run to allow for air flow.

Windows: Sunlight is essential in a coop. Hens have very poor night vision. Even if it’s daylight outside, if it’s dark in the coop, your chickens won’t get moving, eating, or laying their eggs if they can’t see to hop off of the roost. Also, sunshine is a natural sanitizer. And, the hens appreciate a sunny spot on a damp and cold day to sit in. Finally, windows allow you to look in, and sometimes you need to know what’s going on in the henhouse!

Ventilation: Soffits in the eaves are not enough. A cupola is best, as it very effectively pulls damp air up and out. Vents near the eaves are good, but must be large enough. Windows that open when it is hot are a necessity.

Pop door: This is the small door that the chickens use to go in and out. In cold weather, they can come and go, but the barn will remain cozy.

Nesting boxes: Plan on 2 or 3 for seven or fewer hens. For a large flock have 1 box for every 5 birds. These can be homemade or

. Mount these about about 6 inches off of the ground. If they’re higher than the roosts, then the hens will sleep in them  – something that you don’t want them to do.

Exterior space: Provide at least 8 square feet per bird for the fenced run.

Flooring: You can have anything from dirt to wood to concrete. If you do have a dirt floor, then make sure that you can protect your hens from digging predators and rats with underground fencing. If you have wood, you can add a sheet of inexpensive vinyl to keep it from absorbing moisture and to ease cleaning. I have concrete floors in my coops, which is an initial expense, but makes for secure and clean housing.

You’ll also need an area for dust bathing, and a sheltered place, whether inside or out, for the food and water dispensers. You’ll need storage for grain, bedding and tools. I prefer coops and runs that I can walk into for ease of cleaning and also so that I can spend time with my chickens. Don’t be swayed by the ads that tout small starter coops. Buying one will be an expensive mistake, as you’ll need replace it later on. Design and build the right housing from the start and you’ll have a healthy, peaceful, productive flock.

2013-03-06@08.48.26

6 x 8 foot design from a 1930 catalog

If you’re looking for ideas, I have a Pinterest board with examples of small coop designs.

Compost In The Chicken Run

Problem 1:  Chickens need to get plenty of fresh air and exercise. They need soft dirt to scratch in. They do best on a varied diet that includes greens and bugs. In the summer they need shade and cool earth to lie in. But, I can’t let my hens out to free-range unless I’m watching because of hawks that live nearby. So, for much of the day my chickens are confined to a packed-dirt pen. It’s not optimum.

Problem 2:  Every day, I fill a bucket with scraps from my kitchen endeavors. There are onion peels, stale bread and carrot scrapings, coffee grinds and desiccated oranges. Some of it the chickens eat (like tomato cores) and some they don’t (like banana peels.) If I toss it all to the hens, the entire run would soon be a mess of molding food. How to feed the chickens the worthwhile bits without sorting through these dregs? I don’t want to have two compost buckets on my kitchen counter. I have other stuff to compost, too, including weeds and damaged vegetables from the garden, and the muck and trampled on hay from the goat stall. There’s a lot of material from different sources, but I don’t want to fuss with it. I want one easy pile.

Two problems, one solution: build a compost bin in the chicken run. The hens will eat what they like, and shred everything else into little bits. In the summer it becomes a cool, damp respite from the heat. In the winter I use my judgement. If there’s snow cover I don’t put the compost out. It only works if the hens are able to get in it and scratch. You don’t want it to become pile of frozen garbage. But, there are plenty of days in the winter when the hens are happy to have compost to work in. All year long, this method of turning waste into compost is barely any effort for me – the chickens do all of the work of mincing the material and turning it over. Soon enough, it decomposes, shrinks in size, and it turns into good garden soil.

Since I have separate flocks of hens in two barns, I have two compost piles. In the Little Barn’s run there’s an area off to the side of the coop that was easy to turn into a compost heap. I’ve put a sturdy piece of fencing blocking it off, but left openings on both sides. The two exits ensure that the hens don’t get trapped in a corner or bullied and the fencing keeps the compost from being kicked by chicken feet into the rest of the run.

In the Big Barn run, using metal fence posts and chicken wire, we built a compost that forms the letter C. It’s round shape keeps the hens from getting hassled by aggressors. The girls go in and out easily, and yet it keeps the materials contained so that the rest of the run stays tidy. I’ve tried bins made from pallets, but the hens liked roosting on top and then escaping out of the pen. They don’t like to sit on thin chicken wire.

As I mentioned, I throw just about everything in the pile. I put in leftovers that are no longer edible by people. Once in awhile a moldy strawberry goes in the mix. Chickens are fussy and I haven’t had a problem with  them over-indulging in questionable foods. The one thing not  to feed hens is avocado, which is lethal! Also, go easy on the carbohydrates, like bread and pasta. Too much of that and their calcium and protein balance will go off and you’ll find soft-shelled eggs (not to mention fat hens.) I’m also cautious about tough, long veggies, like leek ends, and big chunks of bread that the chickens can choke on. I also avoid foods that they won’t eat right up and that attract vermin, like bones and grease. This is not the pile that I put the manure in. I have a separate system for that described in this FAQ.
It doesn’t take the hens long to shred all of the material, even what they don’t eat, into fine bits. Soon it becomes dark, rich earth. As the pile rises, I dig in and take the loam to the garden. It’s an easy system, and everyone benefits.

Chicken Manure Management

Chickens poop. A lot. Each one of your hens will produce about a quarter pound of manure a day, which according to one source, is 1 cubic foot every six months (I haven’t measured it myself!) Birds don’t pee. Everything that they excrete comes out in one large plop. It’s big, bulky and smelly. It is also a potential carrier of disease and internal parasites, and is a medium that all sorts of unpleasant bugs, such as flies, want to live and breed in. Chicken manure is 75% water and is very high in nitrogen. As the nitrogen decomposes, it gives off ammonia gas. Using dry and absorbent bedding, and having a well-ventilated coop is the first piece of the management plan to keep your hens healthy and living in an environment that is a pleasure for you and the chickens to be in.

The next part of the plan is manure removal. I like using pine shavings as bedding because it dries out the manure and can be sifted through. Hay and straw is not absorbent and becomes wet and matted. I use shavings in the nesting boxes and on the floor. If a hen poops in the nesting box, it’s easy to clean out using a kitty litter scoop. I do this daily. I might also use the scoop if I see a big pile on the floor.

Once a week I go into the coop and, using a fine-tined pitchfork, sift through the shavings, removing the manure. You won’t get all of it, as some will already be dried and broken into tiny bits, but you’ll be able to get the bulk out.

Most of the manure will accumulate under the roosts. Some coops are designed to have “poop boards” where the manure lands, and is untrodden on by the hens. That manure should be scraped off of the boards daily.

Once the manure is removed, if necessary, I add some fresh bedding. Chickens shred everything into tiny bits and eventually both the shavings and manure will turn into fine dust. If you can feel this dust when you breathe, it’s an unhealthy environment for both you and the hens. The dust will coat everything in the barn and will harbor bacteria. So, every few months I shovel everything out and start fresh. By the way, it’s said that cedar shavings give off fumes that are bad for animals. Other woods are okay, although not widely available,  but if you have a woodshop, you can use most other shavings. However, the pine is the most absorbent and safest for your birds.

Since my chickens are confined to dirt pens, those need to be cleaned, too. I use a flexible metal rake to gather what manure I can, and shovel it up. It’s important to keep the dirt in the run dry. Adding coarse builders sand (sold in bags at lumber yards) will improve drainage, and the hens love to dust bathe in it.

I keep a compost pile in the chicken run. I put kitchen scraps, weeds and leaves in it, but I don’t include the manure. Internal parasites, like roundworms and tapeworms, shed eggs and/or body parts in the chicken manure, that then require intermediary hosts to survive.  These hosts are usually insects, like dark wing beetles, that live in damp, dark places near the chickens. By removing the manure front the pen, I’ve stopped the cyle. I’ve never had to worm my hens. I run fecal samples so know that I have never had a problem.

Chicken manure cannot be put directly onto your garden as it will “burn” your plants. Also, you don’t want to put it fresh onto vegetables as it might carry salmonella or e. Coli.  However, although it starts out noxious, when composted, chicken poop ends up as dark loamy earth. There’s a lot of advice about how to take care of compost, which all seems complicated and time-consuming.  I’m a lazy composter and I don’t want to turn piles of manure or pay attention to it. Also, I have dogs who would relish the chance to roll in chicken poop, so I need a method that keeps it out of the way. What I came up with is cheap and tidy. I use plastic garbage cans that have been thrown out because their bottoms cracked. I cut off the ends, and put the trash cans near my vegetable patch. I add the manure and the shavings, and also, once in awhile, dead leaves and discarded greens.

As the manure dries out and the mass shrinks, I add more material. Even in the winter, when the compost is frozen, I keep topping it off. Once it is full, I let it sit for at least six months. It will go from this:

To this:

This manure is very rich, and high in nitrogen and calcium. It’s terrific straight on my bare pumpkin patch that has anemic soil, and mixed into the dirt of my vegetable and flower beds. Nine years ago I started gardening on this property that was mostly granite gravel and poor soil. Now my flower beds look like this, thanks to the girls and their manure.


Little Barn Coop Plans

I have two barns in my backyard. The “Big Barn” is the barn with the Dutch doors that you can see from the HenCam camera (and you can see the inside of it from the BarnCam and GoatCam). It’s a lovely post and beam structure, bought as a kit, and put together by the manufacturer, Country Carpenters. Instead of the standard wood floor, I had a concrete slab installed.

The other barn is a small shed. Ours was custom-built, but it is similar to the prefab buildings for sale at home centers. What makes this coop so charming are the salvaged windows. On one side is a 100+ year-old round window, framed by climbing hydrangea and roses. There are also two Queen Anne-style windows on hinges that let east, morning sunlight into the coop.

HenCam barn

This, too, is on a slab. I like how easy the concrete floor is to clean, and that it makes it harder for predators and vermin to get in and for parasites to lurk. Both barns have chicken pens fenced with wire. It’s installed a half-foot below the ground level to deter predators (and also to keep our burrowing bunny from tunneling out.) Hawk netting covers the run. Even with these secure measures, we close the little door to the coop at night. Raccoons and fisher cats think nothing of climbing fences, ripping off hawk netting, and taking sleeping chickens. The rabbit is also latched into her hutch at night.

Inside the barn are roosts. I like ladder-style roosts with round rungs (1 to 1 1/2-inch diameter). Older and heavy breed chickens find it easier to go up a ladder. Chickens like being able to arrange themselves at different heights. Also inside are the feeder, waterer and nesting boxes. It is essential that chickens have plenty of space. Plan on 4 square feet per bird for the interior of your coop. That’s not including the boxes! Outside, your hens need 8 square feet per bird.

My barns are not insulated or heated. It really isn’t necessary unless you have silkies or frizzles. What is important is that the coop has shade and is well-ventilated and yet draft-free. Make sure that you have windows that open, and  soffits and vents in the eaves.  If you can, install a working cupola. Because the rabbit overheats easily in the summer, a special 8 x 8 foot piece of shade material is stretched over her hutch. The chickens appreciate this shade, too, as most of the yard is in full-sun.

Below is a plan of the HenCam coop. It is just the right size for our hens and bunny. Perhaps this will inspire you!

hencam-barn

Click on the image to get a higher resolution PDF file.